
Introduction
My birthday was coming up, and so was my twin sisters. I know she always likes memories from photos and she has quite a lot of photos in her apartment. Since I digitized all our childhood photos (and everything in between on my parents PC) to my Immich server, and my success with creating a similar Immich photo frame from a tablet, I figured I'd make a digital photo frame with every picture we have of us two using Immich Kiosk. Oh, and this was also kind of inspired by the last gift I made my gf.
The hardware
I ordered the Pritom Touch 7 tablet from amazon for about 50 euros. This is not a particularly fast or good tablet on its own, but it's perfect for a photo frame. It even looks like it. For safety reasons, I of course taped off the front and back camera and the mic holes. I also ordered a phone/tablet stand and 2 right angle connectors, so the USB cable wouldn't portrude as much from the back.
The software
The software was basically the same app as the other photo frame, with the link adjusted to specify the configuration parameters. The only problem was that I host my Immich Kiosk on only my local network, and I don't want to expose a slideshow of all my photos out to the internet. However, it did need to connect to my Immich Kiosk instance from outside my LAN.
Yay for certificates
I first wanted to use a VPN connection to my existing OpenVPN instance, but that proved more difficult than I was aiming for. I then got a pretty wild idea to expose the Immich Kiosk instance out to the internet, but only allow traffic from that specific tablet. This proved to be a pretty good solution. I generated a certificate for the tablet, and used this in my NGINX config for the URL.
To create the CA and the certificate, I used these commands:
openssl genrsa -out myCA.key 2048
openssl req -x509 -new -nodes -key myCA.key -sha256 -days 3650 -out myCA.pem -subj "/CN=MyCA"
openssl genrsa -out tablet.key 2048
openssl req -new -key tablet.key -out tablet.csr -subj "/CN=photo-tablet"
openssl x509 -req -in tablet.csr -CA myCA.pem -CAkey myCA.key -CAcreateserial -out tablet.crt -days 365 -sha256
openssl pkcs12 -export -inkey tablet.key -in tablet.crt -out tablet.p12 -name "photo-frame" -password pass:1234 # Set your own password here of course ;)
This generates a .p12 certificate that can be installed on the tablet, and a .pem file that can be used by NGINX. When installing the certificate in Android, make sure to install it as a VPN or app certificate. To install it, go to:
Android Settings → Security → Encryption & credentials → Install from storage
Then select the .p12 file and enter the password you set when creating it.
NGINX configuration
Finally, in your NGINX configuration file, in the server block, add these two lines:
ssl_client_certificate /etc/nginx/certs/myCA.pem;
ssl_verify_client on;
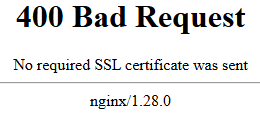
Now, when the tablet requests the URL, it sees the images like normal, but if any other device requests the URL, it gets this nice message: